The Orientation plugin is used to resemble the tilt and motion of your Cerebrum unit.
The Orientation Plugin consists of four sets of data: the angle at which Cerebrum is tilted at, the horizontal and vertical movement of Cerebrum, the amount of gravitational force pulling down on Cerebrum, and the angle at which Cerebrum has rotated.
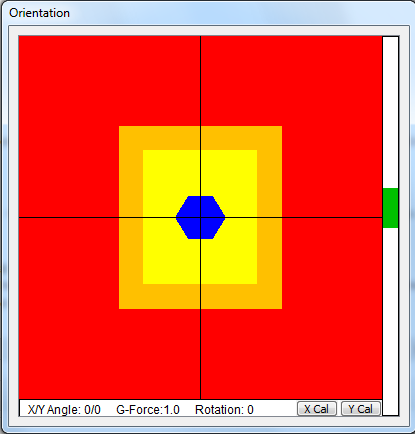
The blue hexagon resembles the orientation of your Cerebrum base unit. It will cumulatively rotate based on the current Rotation value specified in the status area below. It will also shift left to right based on the X Angle, and top to bottom based on the Y Angle.
The yellow rectangular area is considered to be “safe” zone, where as long as the center of the blue hexagon remains within that area, Cerebrum should operate proficiently (in a tilting perspective). This does not, however, mean other environmental variables aren’t an issue.
The orange rectangular area is considered the “warning” zone. It is a rough estimate of when Cerebrum will trigger Recovery Mode if it manages to tilt that far.
The red rectangular area is considered the “failure” zone. If the blue hexagon has breached this point, it is likely your robot has tipped over and is incapable of recovering on its own.
The purple line (not visible in the image) determines the additional force applied to Cerebrum in the direction it is pointing in. The Orientation Plugin does not resemble this data in the status area.
The green bar graph resembles the amount of G-forces applied to Cerebrum. Note this is a rough estimate and loses accuracy when Cerebrum is tilting.
Tilt Calibration
Assuming your robot is fully assembled and you have properly set up the serial port in the Logging Plugin, your Cerebrum may have an issue of always being in Recovery Mode. This is because your Mobility Augments are not tilt-calibrated and otherwise think they must be perfectly centered to be considered safe. For best results, you should correct the calibration each time you replace a Mobility Augment. Tilt Calibration is a quick and simple process, but it is recommended you have someone assist you with it.
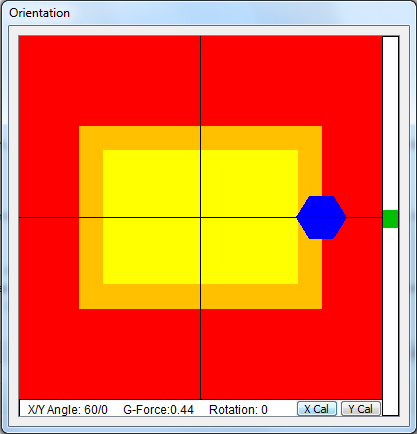
Step 1: Determine the horizontal free-falling threshold. To do this, place both of your hands on the left and right side of your robot, and slowly tilt your robot to one side until you feel it is about to tip over on its own. You should see the blue hexagon tilting to either the left or right side of the screen (as shown in the screenshot above).
Step 2: Maintain the free-falling threshold position, and have someone press the X Cal button. You should see the orange and yellow rectangular areas extend to the center of the blue hexagon.
Step 3: Determine the vertical free-falling threshold. This time, position both of your hands on the front and back of your robot, and slowly tilt your robot to one side until you feel it is about to tip over on its own. You should see the blue hexagon tilting to either the top or bottom side of the screen (as shown in the screenshot above).
Step 4: Maintain the free-falling threshold position, and have someone press the Y Cal button. You should see the orange and yellow rectangular areas extend to the center of the blue hexagon.
A few things to note about Tilt Calibration:
- It does not matter if you decide to calibrate the Y tilt first.
- Some Mobility Augments may require an axis to be tilted in a specific direction, but generally most are indifferent about which direction you tilt in.
- Not all Mobility Augments need/care about Tilt Calibration, and some may have their own built-in calibration that you cannot change.
- Karyon does not sync with other instances of Karyon and it also does not know if a Mobility Augment has been previously calibrated. To avoid the process of repeating calibration for each instance of Karyon you have running, copy the “calibration.txt” file to the outdated Karyon settings folder.
Keyboard Shortcuts
X Set the X-tilt calibration.
Y Set the Y-tilt calibration.